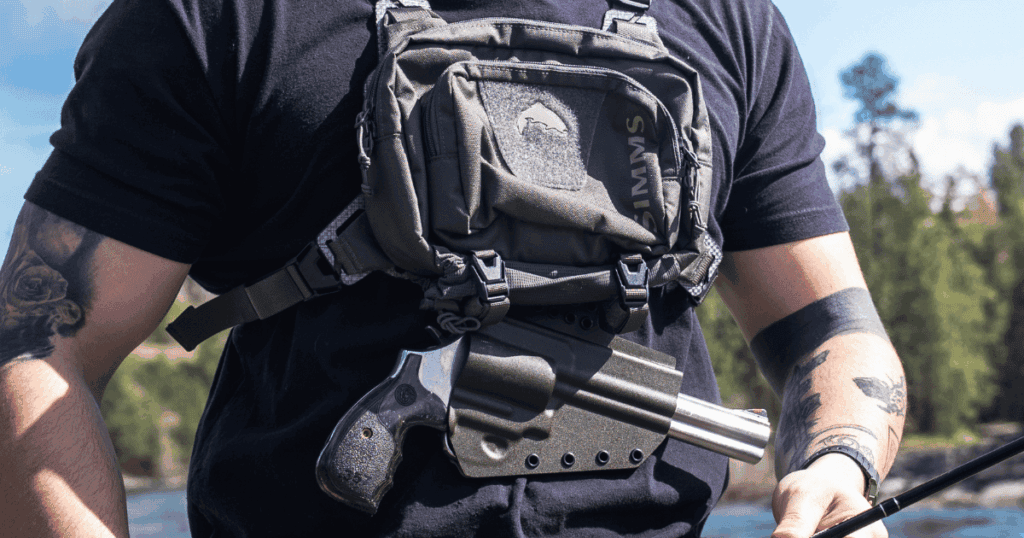
If you’ve already read our breakdown of why the Tackle-Link is a game-changer for fishing, you know how much easier it makes carrying a sidearm when you’re running a chest tackle pack. It keeps your pistol secure, clear of your waders, and accessible even when you’re managing line, nets, or fast-moving water.
Now it’s time to set it up. Below, we’ll walk through how to build your chest holster pack with the Tackle-Link, step by step. The goal is simple: a consistent, safe draw that never gets in the way of your fishing and stays put no matter how much you move on the water.
Tools and Parts to Set Up Your Tackle-Link Holster
Gather these parts and tools before you start for a quick and reliable setup.
Parts
- Tackle-Link adapter plate
- Kydex holster
- Chicago screws or bolts (included with the kit)
- Blue Loctite (supplied)
- Chest pack
Tools
- Phillips or flat screwdriver — or a 3 mm hex driver (if your kit uses hex screws)
- Light torque wrench or torque driver (use low torque settings)
- Marker (for marking hole alignment and height)
- Tape measure (for measuring height and cant)
- Small level or a stiff index card (to check cant/tilt visually)
Step 1: Decide on your carry philosophy – center, offset, or strong-side.
This decision is the first step in setting up a chest holster pack. It shapes your draw, comfort, and how the holster clears straps or pack edges. You’ll fine-tune the carry later by adjusting height and cant so the grip presents cleanly and the muzzle clears your harness.
Just keep in mind that each style changes where your hand travels during a draw and how the gun sits under layers.
Centerline Mount
- Best for two-handed retrieval.
- Keeps weight balanced across your chest.
- Low profile under jackets and layers.
- Good if you spend long periods casting or tying rigs since the holster stays centered and predictable.
Offset (Slightly to Your Dominant Side)
- Faster single-hand indexing and natural hand travel.
- Helps when you need one-handed access while holding a rod, net, or pack strap.
- Keeps the muzzle clear of center straps when you lean or turn.
Strong-Side (More Offset)
- Feels most like a traditional hip carry translated to the chest.
- Works if you prefer a classic pistol index and draw path.
- You’ll usually add more cant so the grip presents cleanly.
Step 2: Attach the adapter plate and holster to your tackle pack.
Before measuring height or setting your cant, you need the adapter plate and holster mounted to your chest tackle pack in a way that allows for adjustment.
- Lay out your chest pack. Set your tackle pack flat with the harness side facing up.
- Position the adapter plate. Place the Tackle-Link adapter plate roughly where you want the holster to sit. Don’t worry about perfect placement yet. You’ll fine-tune it in the next steps.
- Thread the straps or buckles. Run your pack’s straps or buckles through the slots or wings in the adapter plate. Each brand routes slightly differently, but the plate should sit flat and not twist the straps.
- Center the plate. Adjust the plate so it sits centered and flat on the harness. This becomes your base for height and cant adjustments.
- Align the holster. Place the Kydex holster against the plate and line up the mounting holes.
- Start the screws by hand. Insert the screws or bolts and turn them just enough that the holster stays attached but can still slide up and down.
- Leave everything loose. Don’t tighten the hardware yet. You need that play to dial in height and clearance in Step 3.
Step 3: Measure height and clearance.
Height is how high or low the holster rides on your chest. Clearance is the space the pistol needs to draw without hitting your pack, beltline, or layers. Getting both right is what makes your draw smooth.
Measure height first since it’s the biggest factor in draw comfort and muzzle clearance. You’ll want to choose a height that clears the beltline and doesn’t touch your pack when you sit.
- Dress for the water. Wear your regular pack and other fishing layers. Tighten straps as you would for a long day.
- Pick your sternum reference. Choose the top of your sternum or the nipple line, whichever feels most repeatable and comfortable for you. Place a small dot on your shirt or base layer, right above the center of your chest.
- Set height while standing. Slide the holster up and down until the muzzle clears your beltline.
- Check seated clearance. Sit in a chair, or mimic how you lean forward when tying knots, unhooking fish, or managing gear. If the holster binds on your pack or belt or digs into your midsection, adjust up or down and retest.
- Simulate movement. Bend forward, raise both arms overhead, and twist slightly. Watch for any contact points that could unseat or snag the firearm.
- Record your measurement. Use the tape measure to record the distance from your sternum reference to the top edge of the holster. Also note whether the top of the holster aligns with “mid-sternum” or “below nipple line” for quick re-setup later.
Step 4: Set your cant and draw angle.
Cant controls how naturally your hand finds the grip. Small angles will improve indexing and presentation without compromising retention.
You can angle the holster anywhere from vertical to a mild forward tilt (roughly a 0°–20° range). Most people land somewhere in the middle.
- 10°–15° forward cant (toe-in) works for most people.
- Reduce toward 0° if you prefer a more vertical, two-handed presentation.
Tip: On chest rigs, forward cant usually helps your dominant hand clear the harness after your support hand pulls the pack out of the way.
How To Set The Cant
- Keep the holster loosely mounted as described in Step 2.
- Pivot the holster to the angle you prefer. Use your fingers and a small level, or the edge of an index card, to eyeball the tilt.
- Stand, sit, and check how your hand meets the grip, allowing gravity to help layers settle.
- Run a slow, controlled dry draw. Note where your hand lands and whether the grip presents cleanly.
- If it feels off, adjust the angle in small increments (2°–5°) and retest.
When the angle feels right, move to Step 5 to lock everything down.
Step 5: Secure mounting hardware and lock it down.
Once height and cant are dialed in, lock your setup in place.
- Reset the screws by hand. Back each screw out slightly and restart it by hand to make sure everything is aligned cleanly.
- Set your final position. Confirm the exact height, cant, and offset before tightening anything.
- Torque lightly. Use a light torque setting or apply firm pressure with your hand. You want the screws snug, not crushed. Don’t try to muscle them down.
- Add blue Loctite to the threads. A small drop on each screw is enough. This stops vibration loosening while still allowing future adjustments.
- Final snug. Finish by giving each screw an even final tighten once the Loctite is applied.
Tips
- Leave a hair of play for micro-adjustments before the final Loctite cure. If you plan to tweak, don’t fully cure the Loctite until you’re sure.
- Over-torquing can warp Tegris plates or cause the edges of Kydex to mushroom. If the screw starts to resist hard, back off and re-evaluate.
- Perform a controlled dry draw and re-holster to confirm retention and smooth presentation after you torque and apply Loctite.
- Re-check hardware after the first day in the water. Vibration and new packing can cause components to settle slightly. A quick half-turn check keeps your setup reliable.
Troubleshooting Common Fit Issues
- The holster binds on the pack strap. Raise the holster about ½” or reduce the forward tilt a bit. Re-check clearance while seated and standing.
- The optic hits the harness. Move the holster up slightly or offset it to the dominant side. If it still contacts, run a shallower tilt or adjust strap routing so the optic clears.
- The mounting hardware loosens. Clean the threads, add a small drop of blue Loctite, and re-snug the screws. Recheck them after a short hike since vibration often reveals loose spots.
- There’s excess slop in the straps. Re-thread buckles, tighten webbing, or add thin shims/Velcro strips in the adapter relief cuts to remove play. Snap a photo of your final threading for reference.
- The holster rides too high when seated. Lower the holster ½”–1″ or use a milder forward tilt so the grip doesn’t press into your chest. Test with the same layers or waders you plan to wear on the water.
Quick troubleshooting routine: Make one small change at a time. After each tweak, do a dry draw and a movement check (sit, stand, bend). If it still isn’t right, undo that change and try the next option. This keeps you from over-adjusting and makes it easier to find the sweet spot.
Your Setup, Stream-Ready
A good setup isn’t about cranking down hardware once and forgetting it. It’s about building a chest rig that allows you to move, sit, and draw in the same way every time.
Once you’ve got your Tackle-Link dialed, you’ll have a chest pack that keeps your pistol secure, accessible, and right where you expect it every time you head out fishing.
November 24, 2025